


This food processor pie crust is my go-to for buttery, flaky pies without the fuss. With just 4 ingredients and a few quick pulses, I can have a perfectly smooth, easy-to-roll dough that’s ready for sweet or savory fillings. It’s the simplest pie crust in the food processor you’ll ever make, and it tastes just as good (if not better) than the old-fashioned kind. I love keeping a few rounds of this dough in the freezer so I’m always ready for last-minute baking, especially around the holidays!
Food Processor Pie Dough with Butter and Shortening
My food processor pie dough is fast and foolproof. Instead of cutting butter and shortening by hand, my food processor does it in seconds, keeping the fat evenly distributed for consistent flakiness every time. I make my food processor pie crust with butter and shortening so I get the best of both worlds: buttery flavor from the butter, and that tender, sturdy structure from the shortening. I like to add a little sugar to my crust when I’m baking sweets, but I leave it out when I’m making savory pies. Yep, this easy pie crust works for both!
Using the food processor is such a simple technique that works perfectly for any single pie crust recipe, whether you’re blind baking for cream pies or filling it with fruit. I also like that it’s easy to scale up; just double the ingredients and make two crusts at once for double-crust pies or holiday baking marathons.


Email this Recipe
Enter your email and we’ll send the recipe directly to you!
By submitting this form, you consent to receive emails from Easy Dessert Recipes.
Why I Chill My Flour
I always chill the flour, food processor bowl, and blade for 10 minutes before starting. It might sound extra, but keeping everything extra cold is the key to flaky pastry. When the butter and shortening stay solid until the dough hits the oven, they release steam and form those tender, crisp layers that make a homemade pie crust so irresistible.

Food Processor Pie Crust Recipe
Equipment
- Kitchen Scale (optional)
- Food Processor
- Rolling Pin
- 9-inch Pie Pan
- Pie Weights (optional)
Ingredients
- 1⅓ cups all-purpose flour divided*
- ½ teaspoon kosher salt
- 1 tablespoon granulated sugar optional**
- 6 tablespoons unsalted butter chilled and cubed (¾ stick)
- ¼ cup vegetable shortening chilled and cubed (¼ stick)
- 2 tablespoons ice water
Instructions
For the Dough
- Add ⅔ of the flour, plus all of the salt and sugar into your food processor. Pulse 1-2 times to combine.1⅓ cups all-purpose flour, ½ teaspoon kosher salt, 1 tablespoon granulated sugar

- Add the butter and shortening cubes evenly over the flour and pulse a couple of times until the dough starts coming together.6 tablespoons unsalted butter, ¼ cup vegetable shortening
- Add the remaining flour and pulse 3-4 times until the dough starts to crumble and break apart again.
- Slowly add the cold water into the processor and pulse, until it starts to form a wet dough. Don’t add too much water–the dough should just come together. You should use anywhere from 2-4 tablespoons.2 tablespoons ice water
- Press the dough into a flat circle, wrap it tightly in plastic wrap, and chill in the refrigerator for at least 2 hours or overnight.
- When it’s time to bake, roll out the dough carefully on a lightly-floured surface, moving it in quarter circles with your hands while rolling it out. Sprinkle some flour on the surface when needed to prevent sticking. Roll it out around 2 inches bigger than your pan or about ⅛ inch thick.
- Gently transfer the dough to the pan by adding some flour onto the surface and wrapping the dough carefully around your rolling pin.
- Press the dough into the pan carefully so it’s sticking to the pan everywhere.
- Cut off excess overhanging dough with a sharp knife or some scissors, but leave around 1 inch of overhang. Roll the overlapping inch under itself to create a firmer and rim.
- Use your index finger and the index finger and thumb from the other hand to crimp the dough to form a scalloped edge.
- Chill the pie crust again for at least 15 minutes before going on.


To Bake the Crust
- To Blind Bake: Bake the chilled pie crust at 425°F for 12-15 minutes without filling. You can use the pie weights as shown.
- To Fully Bake: Start by blind baking, then fill with your filling, and bake at 375°F for 15-20 minutes.
- To Fully Bake without Blind Baking: Bake at 375°F for 45 minutes.

Notes
- I tested this crust with both all-butter and half-shortening versions, and this balance gave the most foolproof texture–tender like a butter crust but easier to roll like a shortening one.
- Cold butter and shortening guarantees a flaky crust, but cold flour is even better! Try chilling your food processor bowl/blade and the flour for 10 minutes in the fridge before starting.
- Adding ⅔ of the flour first, then ⅓ later helps coat the fat in flour first, then incorporates the rest for better texture and reduced gluten development.
- Use just enough water to bring the dough together. Too much water, and you’ll need to add more flour to make up for it (which will lead to a tough crust). Not enough water, and the dough will be dry and start to crack while rolling it out. The latter can be fixed as you go, the former can’t. So be on the safe side when adding water, just a little at a time.
- You can add a few teaspoons of vodka or vinegar in place of some water to prevent gluten formation. I didn’t find this necessary, but it’s a good insurance policy!
- Keeping the dough cool will help create a more tender, flaky crust. Put your ingredients/dough back in the fridge any time they start getting warm.
- Make sure you don’t overwork the dough. Stop pulsing when you can still see small pea-sized amounts of fat (butter and shortening) in there. The dough should hold when pressed between your fingers but not form a ball yet
- Sprinkle your counter/surface with flour before rolling out the dough to prevent it from sticking.
- If the dough is too hard to roll out, let it sit on the counter for a couple of minutes. Too soft? Put it back into the fridge.
- If you chill overnight, let the dough rest on the counter for 5-10 minutes before rolling to soften it up and prevent cracking.
- Use baking beads/pie weights (or use dried beans) to blind-bake the pie crust. These act as weights to hold down the dough, keep it from moving or slipping and prevent it from puffing up while cooking. Place them on parchment for easy removal.
- A metal pie dish will conduct heat best for crisp bottoms. Glass is great for seeing doneness but may require 5 extra minutes of bake time.
- If your pie crust shrinks while cooking, it most likely means you didn’t give it enough time to rest. The best way to prevent this is simply to give it the time it needs. This is why you need to give it time to rest/chill in the refrigerator after you make the dough and right before baking.
- If your pie crust turns out tough, you likely overworked the dough, causing excess gluten development. Next time, work it less, or try adding a little vodka or vinegar!
How to Make Pie Crust in a Food Processor Step-by-Step
Pulse the Flour and Sugar: Add about 1 cup of all-purpose flour, plus ½ teaspoon of kosher salt and 1 tablespoon of granulated sugar into your food processor. Pulse 1-2 times to combine. The sugar is optional, but I find it helps make the crust more tender. I most often add it when making a sweet pie.

Add the Butter and Shortening: Add 6 tablespoons of cold cubed unsalted butter and ¼ cup of cold cubed shortening evenly over the flour and pulse a couple of times until the dough starts coming together. Err on the side of less is more for pulsing to limit gluten development.

Form the Dough: Add the remaining ⅓ cup of all-purpose flour and pulse 3-4 times, just until the dough starts to crumble and break apart again.

Add the Ice Water: Transfer the pie dough from the food processor to a bowl. Add ice water 1 tablespoon at a time, and press the dough with a spatula until it comes together into a ball. Don’t add too much water, the dough should just come together. You should use anywhere from 2-4 tablespoons. For extra insurance, you can swap a few teaspoons of the water for vodka or vinegar–this will help ensure the crust stays tender.

Chill the Dough: Press the dough into a flat circle, wrap it tightly in plastic wrap, and chill in the refrigerator for at least 2 hours or overnight. The dough should come together when pressed, but you should still see pea-sized pieces of butter and shortening in there.

Roll Out the Dough: When it’s time to bake, roll out the pie dough carefully on a lightly floured surface, moving it in quarter circles with your hands while rolling it out. Sprinkle some flour on the surface when needed to prevent sticking. Roll it out around 2 inches bigger than your pan or about ⅛ inch thick. If you chilled the dough overnight, I recommend setting it out at room temperature for 5-10 minutes to soften slightly so it doesn’t crack.

Drape the Dough: Gently transfer the dough to the pan by adding some flour onto the surface and wrapping the dough carefully around your rolling pin.

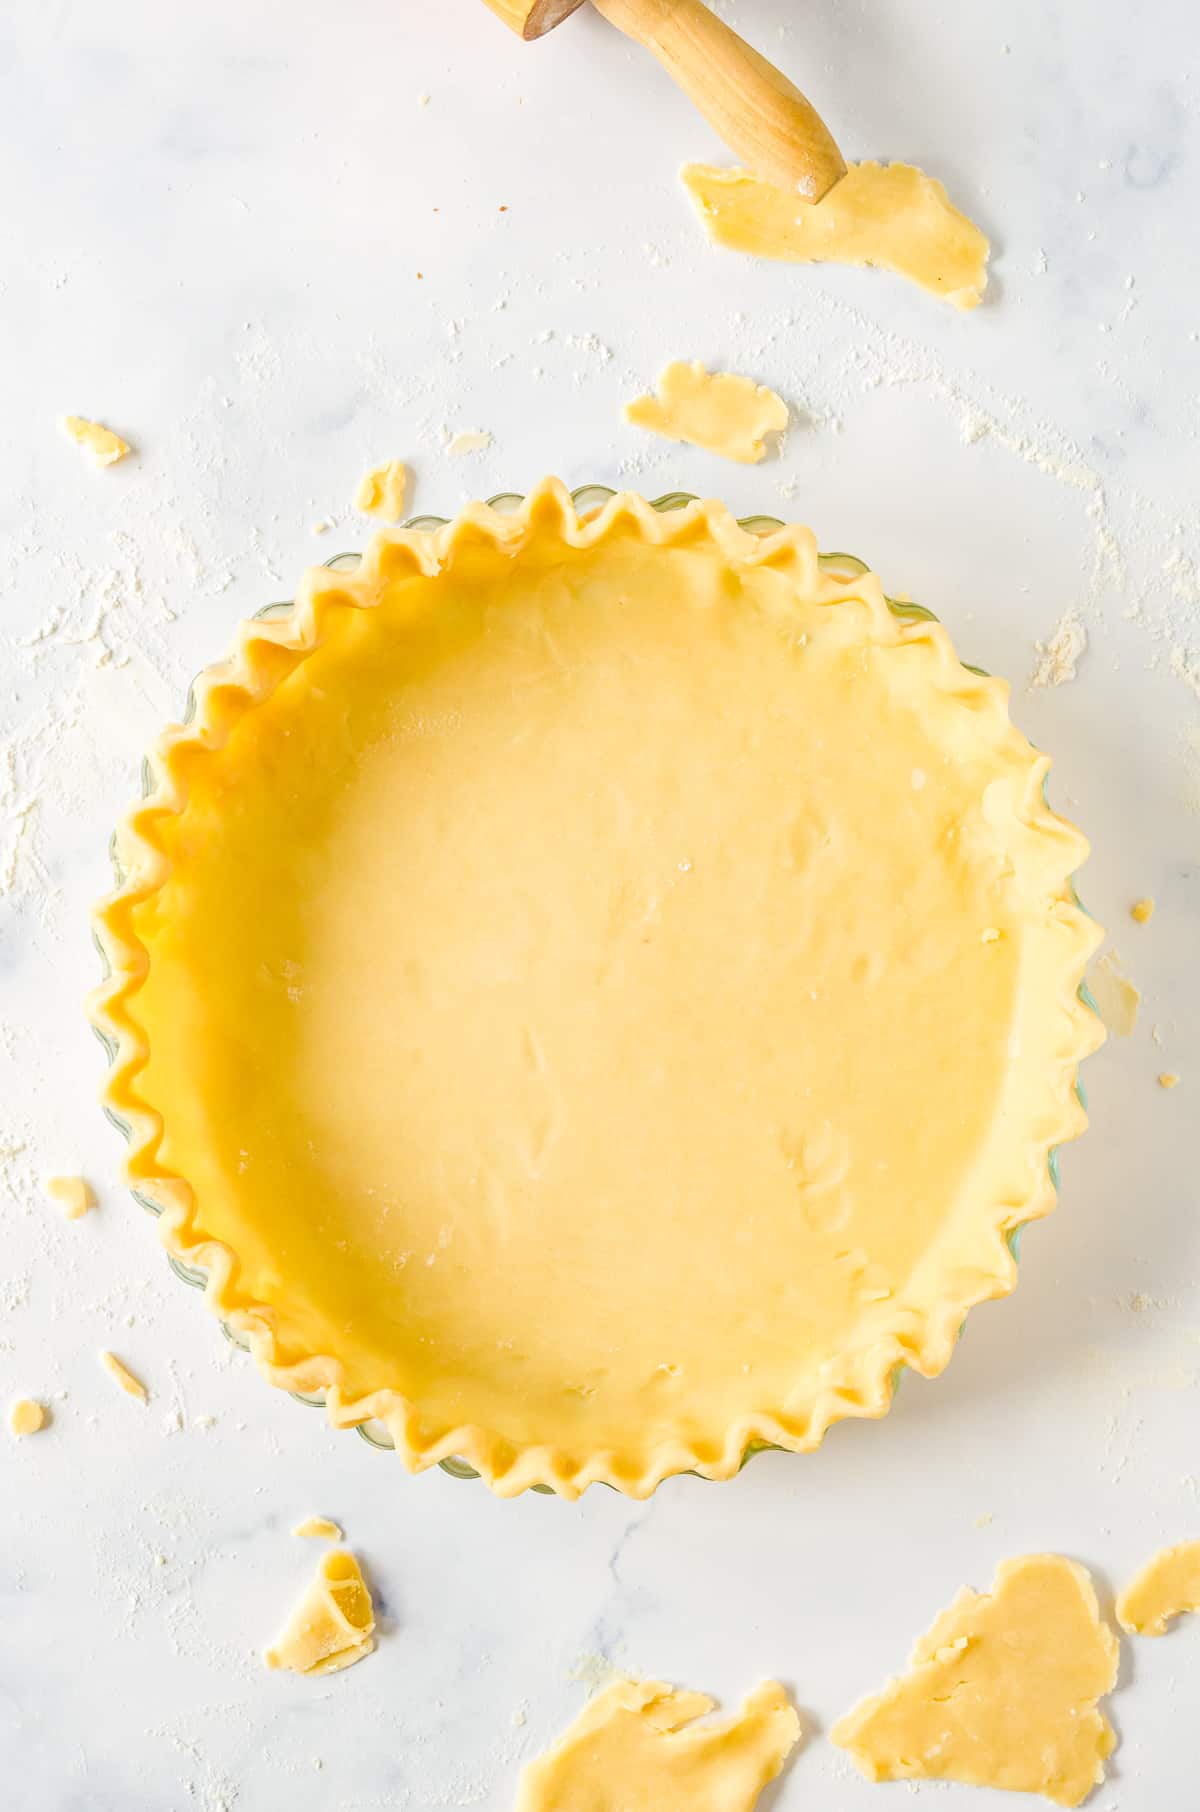
Shape the Dough: Press the dough into the pan carefully so it’s sticking to the pan everywhere. Cut off the excess overhanging dough with a sharp knife or some scissors, but leave around 1 inch of overhang. Roll the overlapping inch under itself to create a firmer rim. Use your index finger and the index finger and thumb from the other hand to crimp the dough to form a scalloped edge. Chill the pie crust again for at least 15 minutes before moving on.

Blind Bake the Crust: Bake the chilled pie crust at 425°F for 12-15 minutes without filling so it stays nice and firm. You can use the pie weights as shown. From here, you can fill the pie as desired and bake according to the recipe instructions.


Leave a Reply