


My homemade Thin Mints recipe captures that iconic Girl Scout cookie snap without the year-long wait. Unlike traditional chilled doughs that can be finicky to roll, my food-processor method brings the dough together in just seconds. I designed these mint chocolate wafer cookies to be crisp-tender, meaning they won’t shatter when you bite them, but they still hold up perfectly to a deep chocolate dunk.

Girl Scout Thin Mint Cookies Copycat
The last time I ordered a box of Thin Mints, I was disappointed; the coating felt waxy and lacked a deep cocoa punch. In this copycat version, I prioritize high-quality semisweet chocolate with at least 60% cacao. This ensures the chocolate isn’t just a vehicle for sugar, but a rich counterpoint to the peppermint.
The only “special” ingredient I needed for these Thin Mints was pure peppermint extract. I’ve made quite a few peppermint recipes in the past, so I did have some on hand. But if you don’t bake that often, it’s something you’ll need to head to the store to get before starting this recipe. If you find yourself without it, don’t swap for regular mint extract, or you’ll end up with a toothpaste flavor!


Email this Recipe
Enter your email and we’ll send the recipe directly to you!
By submitting this form, you consent to receive emails from Easy Dessert Recipes.
Pro Tip for a Clean Coating
Because these cookies are made with vegetable oil for that signature snap, they can be slightly more delicate than a butter cookie. If you dip them at room temperature, you’ll likely find crumbs floating in your chocolate.
I’ve found that flash-freezing the baked wafers for 10-15 minutes before dipping is the secret to a perfect finish. The cold cookie helps the chocolate set immediately, which prevents crumbs from getting into your dipping bowl and ensures a smooth shell every time.

Homemade Thin Mints Recipe
Equipment
- Kitchen Scale (optional)
- Food Processor
- Baking Sheet
- Rolling Pin
Ingredients
For the Wafer Cookies
- 1¼ cups all-purpose flour sifted
- ½ cup unsweetened cocoa powder sifted
- 1 cup granulated sugar
- ¼ teaspoon baking soda
- ¼ teaspoon kosher salt
- ¾ cup vegetable oil
- 3 tablespoons milk
- 1 teaspoon pure vanilla extract
- ¾ teaspoon pure peppermint extract *
For the Chocolate Coating
- 2 cups chopped semisweet chocolate
- 1 tablespoon milk warmed**
- 1 teaspoon pure peppermint extract
Instructions
- Using a food processor add the flour, cocoa powder, sugar, baking soda, and salt, and pulse until combined well.1¼ cups all-purpose flour, ½ cup unsweetened cocoa powder, 1 cup granulated sugar, ¼ teaspoon baking soda, ¼ teaspoon kosher salt

- Add the oil, milk, vanilla, and peppermint, and pulse or blend low until fully combined. The mixture should be forming together in a solid round shape.¾ cup vegetable oil, 3 tablespoons milk, 1 teaspoon pure vanilla extract, ¾ teaspoon pure peppermint extract
- Transfer the dough to a large mixing bowl and knead with hands until a solid smooth ball is formed.
- Place the dough in the refrigerator and cover while chilling for 1 hour. This step is optional, but highly recommended!
- Preheat oven to 350°F. Line a baking sheet with parchment paper and set aside.
- Place the dough on a flat surface and roll it out into a flat ¼-inch sheet.
- Using a small circular cookie cutter or a thin fluted glass to press out small circular cookie wafers.
- Place the wafers onto the prepared baking sheet and bake for 14-20 minutes depending on desired crispness. These are excellent soft and crisp!
- Remove from the oven and let cool completely.
- While the cookies cool, make the chocolate coating: Place the semisweet chocolate into a medium-sized bowl set over a large saucepan with about 2 inches of water in it. Bring to a low boil and stir the chocolate until fully melted.2 cups chopped semisweet chocolate
- Add the warmed milk and peppermint to the chocolate and stir well.1 tablespoon milk, 1 teaspoon pure peppermint extract
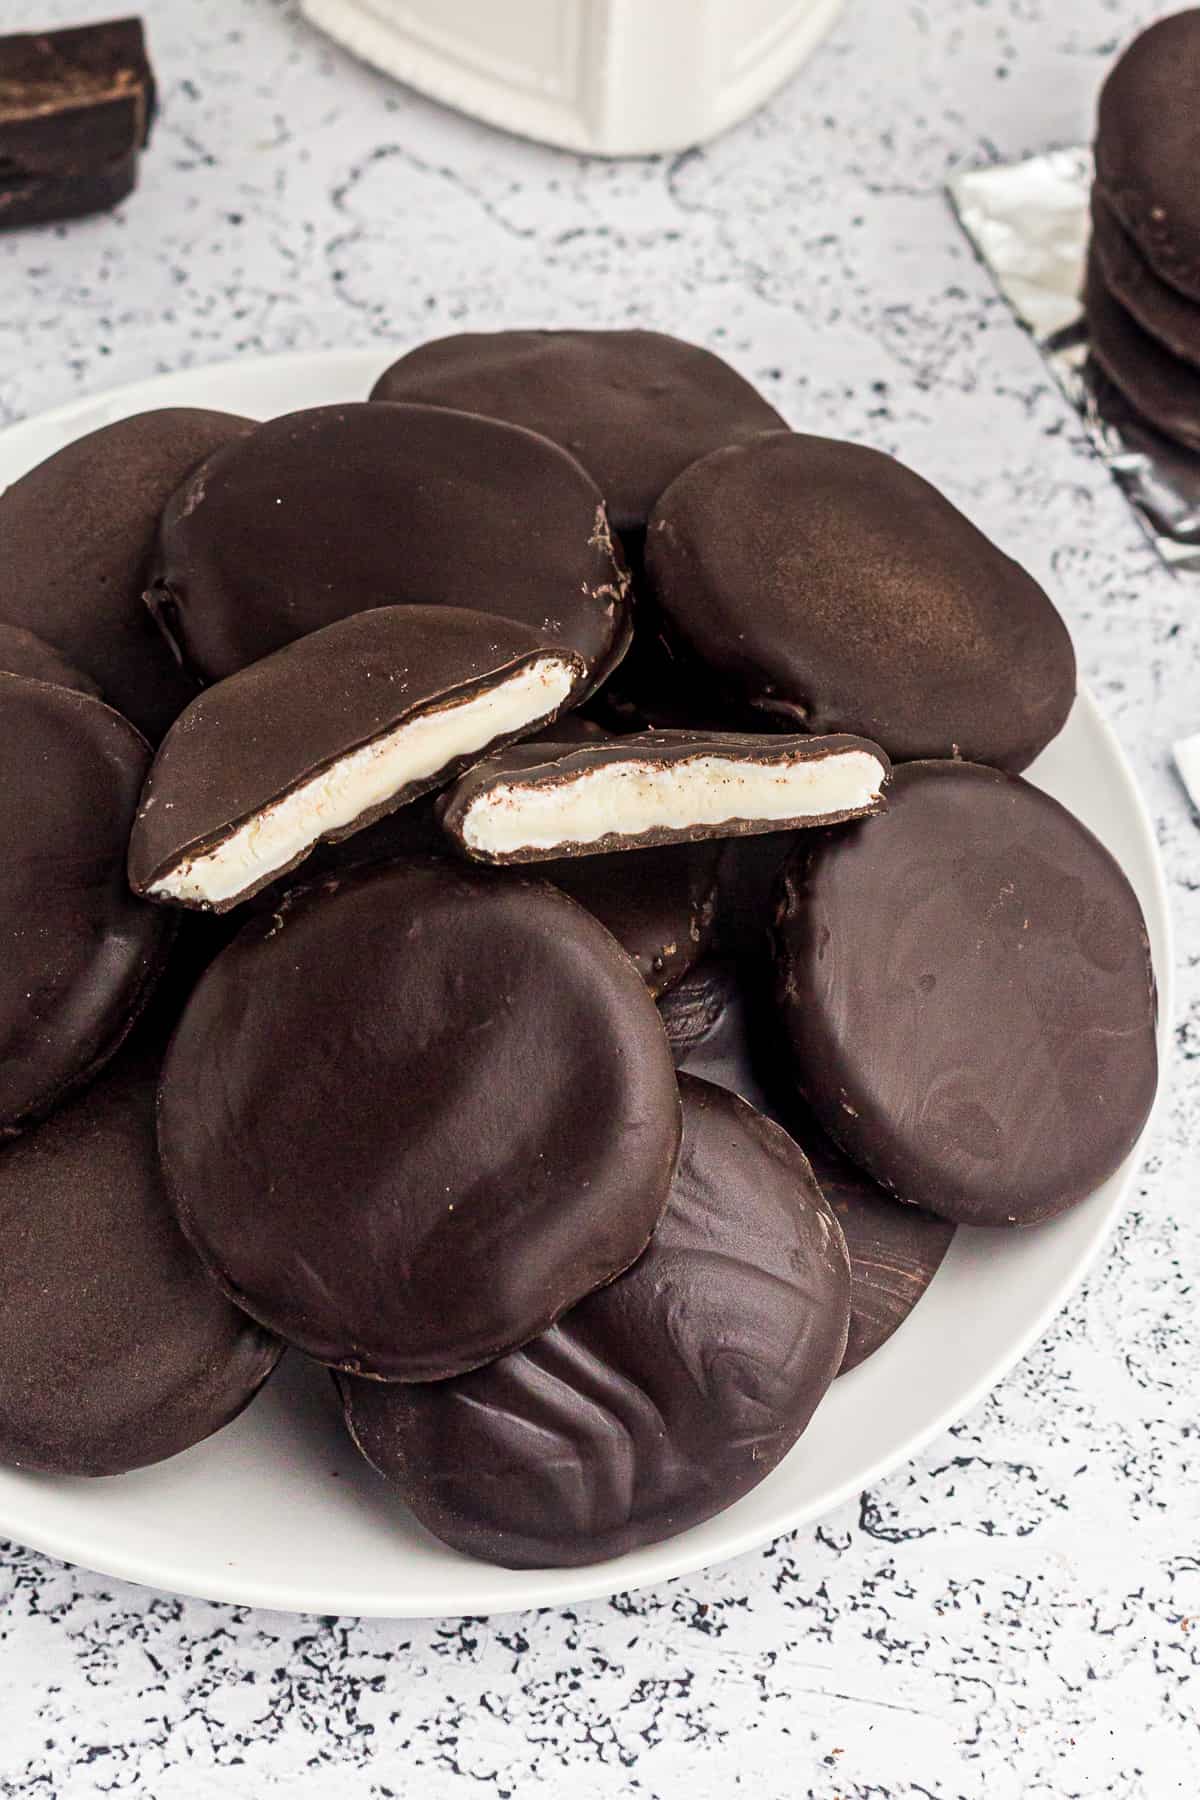
- Dip each wafer into the chocolate and place back on the parchment paper to settle.
- When finished covering all of the wafers with chocolate place the sheet pan in the refrigerator to speed the chocolate hardening process.


Notes
- Sift the cocoa and flour together before pulsing to prevent dry pockets of flour or cocoa in the wafers.
- If the dough seems too sticky, you can more easily roll it out by sandwiching it between 2 layers of parchment.
- Use a 2 or 3-inch cookie cutter for evenly-sized cookies.
- You can also roll the dough into a log, chill for one hour, then slice the dough into equal-sized pieces for slice-and-bake cookies.
- If your chocolate looks grainy when you add the milk, it may have seized. Whisk in an extra teaspoon of warm milk or oil immediately to smooth it back out.
- Use a fork to dunk each cookie in the chocolate. This will allow the excess to drip off more easily.
- When the cookie is on the fork, tap your wrist (not the fork itself) against the edge of the bowl. This vibration shakes off the excess chocolate smoothly without knocking the cookie off the fork.
- When placing the cookie on parchment, slide it forward slightly as you set it down. This prevents a puddle of chocolate from forming at the base.
Tip For Enjoying Frozen Cookies
I tested these and found that the coconut oil version (see notes) holds up better in the freezer than the milk version, which can get a bit sweaty when thawing.
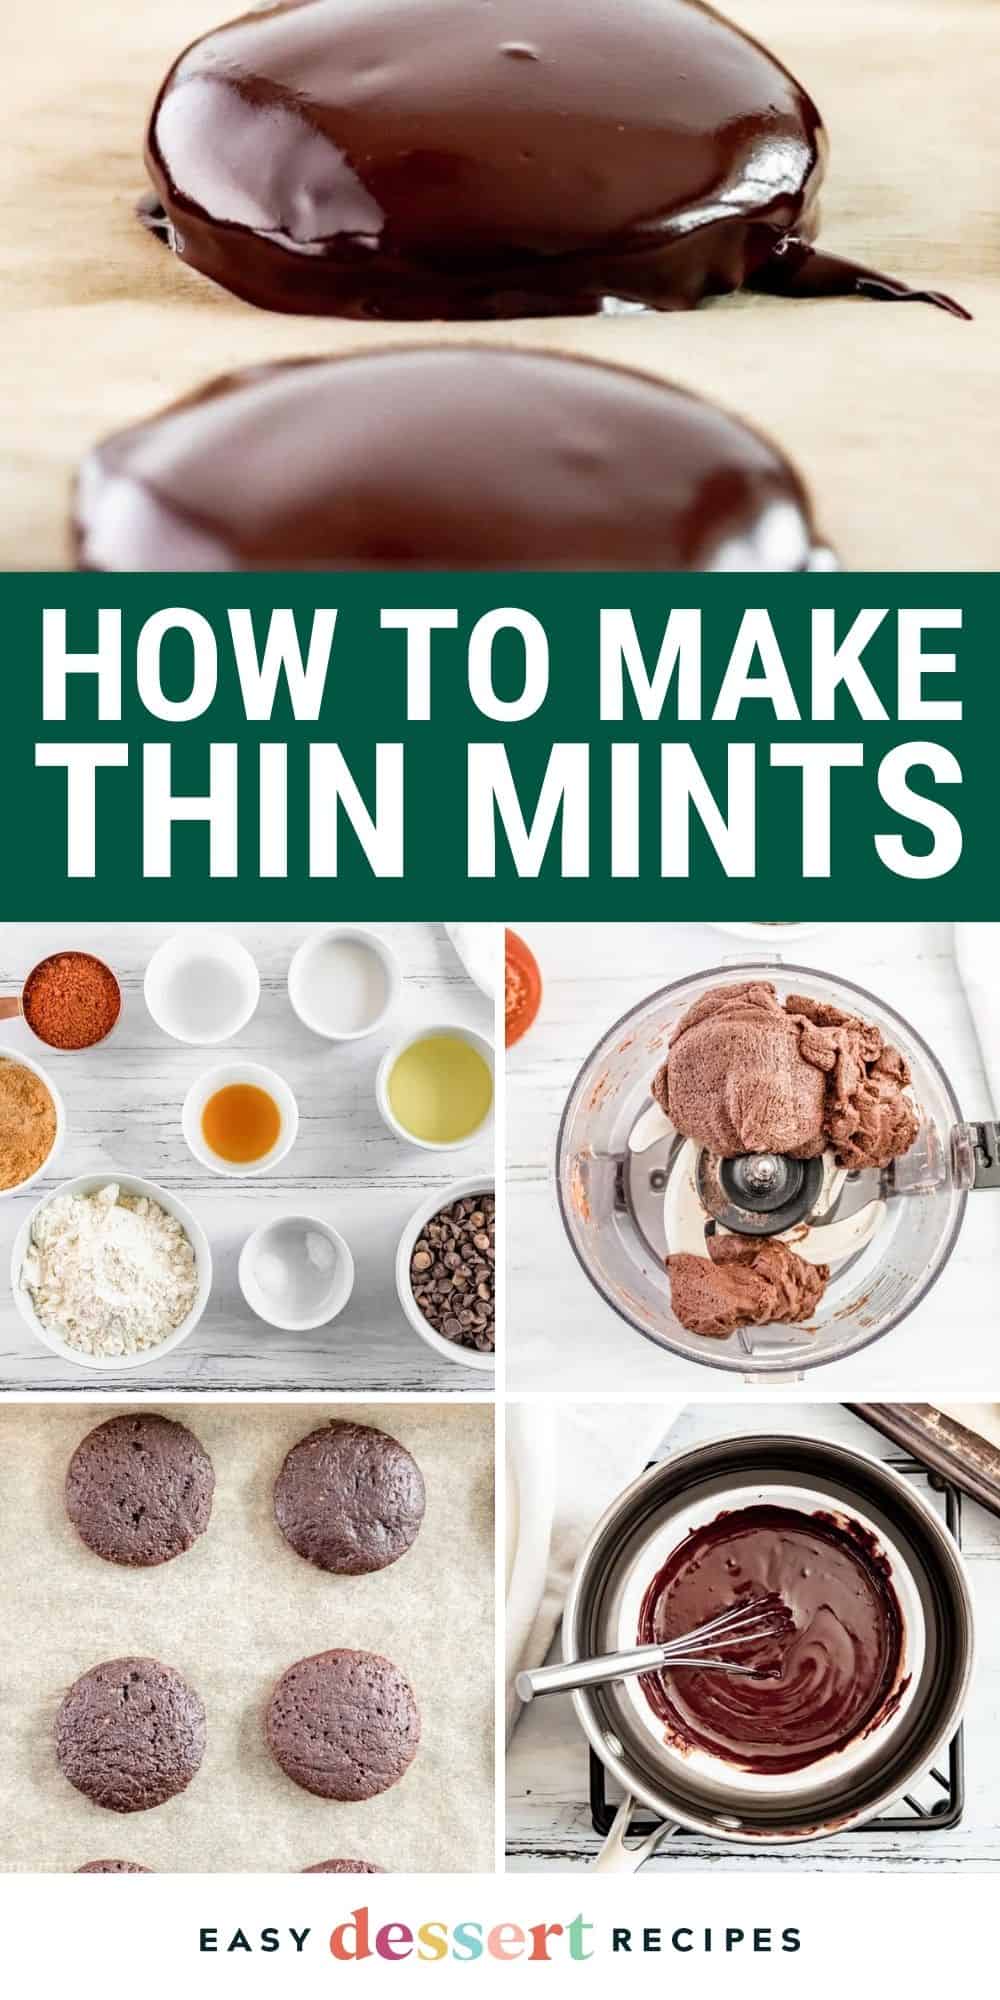
How to Make Thin Mints Step-by-Step
Prep: Gather up everything you need to make these copycat thin mint cookies. Chop the semisweet chocolate.

Mix the Dry Ingredients: Using a food processor, add 1¼ cups of sifted all-purpose flour, ½ cup of sifted unsweetened cocoa powder, 1 cup of granulated sugar, ¼ teaspoon of baking soda, and ¼ teaspoon of kosher salt, and pulse until combined well.

Form and Chill the Dough: Add ¾ cup of vegetable oil, 3 tablespoons of milk, 1 teaspoon of vanilla extract, and ¾ teaspoon of peppermint extract, and pulse on low–over-processing the dough can lead to a tough cookie rather than that signature shortbread snap! Transfer the dough to a large mixing bowl and knead with your hands until a solid, smooth ball is formed. Place the dough in the refrigerator and cover while chilling for 1 hour. Chilling is optional, but highly recommended!

Portion the Cookies: Meanwhile, preheat your oven to 350°F, line a baking sheet with parchment paper, and set aside. Once chilled, place the dough on a flat surface and roll it out into a flat ¼-inch sheet. Use a small circular cookie cutter or a thin fluted glass to press out small circular cookie wafers.

Bake the Cookies: Place the wafers onto the prepared baking sheet and bake in the preheated oven for 14-20 minutes, depending on your desired crispness. These are excellent soft and crisp! Remove from the oven and let cool completely.

Melt the Coating: Place 2 cups of chopped semisweet chocolate into a medium-sized bowl set over a large saucepan with about 2 inches of water in it (double boiler). Bring to a low boil and stir the chocolate until fully melted. Add 1 tablespoon of warm milk and 1 teaspoon of peppermint extract to the chocolate and stir well.

Dip the Cookies: Dip each wafer into the chocolate and place it back on the parchment paper to settle. When finished covering all of the wafers with chocolate, place the sheet pan in the refrigerator to speed the chocolate hardening process.

How to Store and Freeze
Store leftover Thin Mints in an airtight container at room temperature for up to 3 days, in the refrigerator for up to 1 week, or in the freezer for up to 2 months. Enjoy chilled or at room temperature.


Leave a Reply