


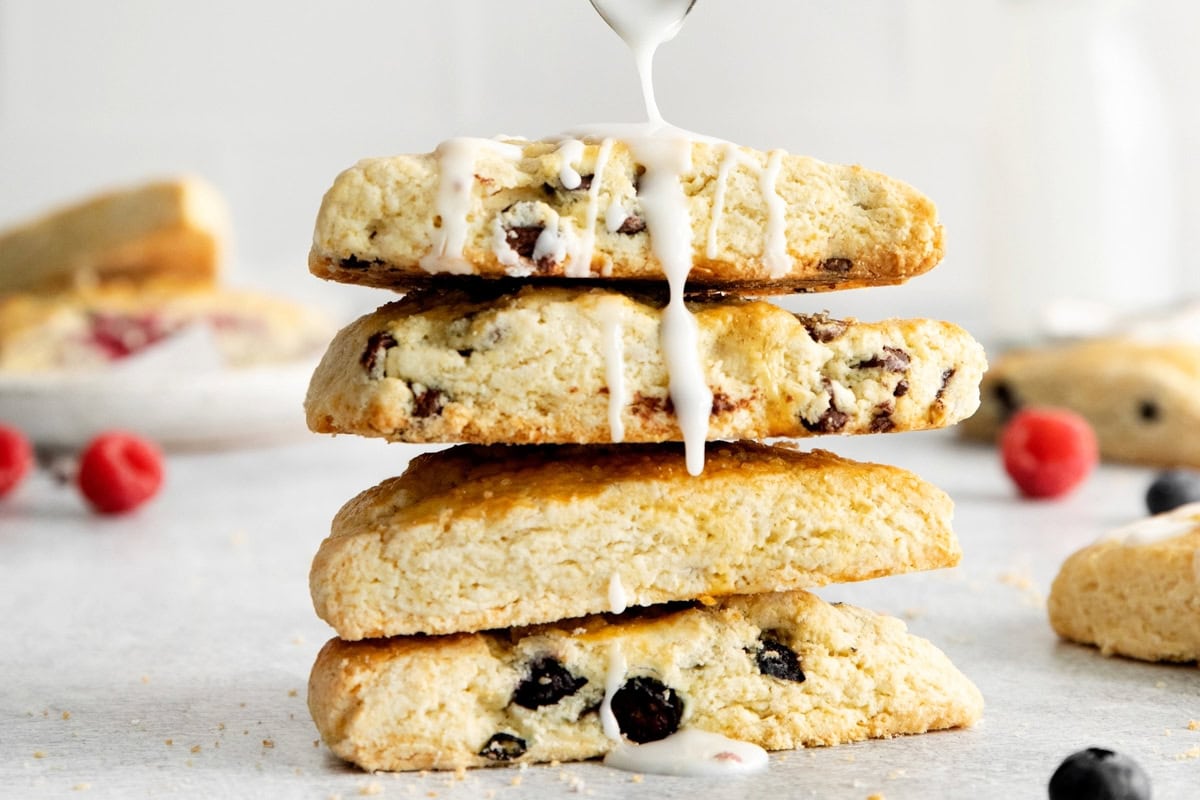
If you’re looking for a flaky American scone that’s golden on the outside, yet soft and fluffy in the middle, you’ve found it. I’ve spent years perfecting my master scone recipe to ensure it’s never dry and always easy to make. This is a “choose your own adventure” recipe: use this one dough to make everything from blueberry, raspberry, and chocolate chip scones to a savory cheddar version. I’m sharing my pro-tips for a tender crumb so you can skip the bakery line and get perfect results at home every time.

Any Flavor Tender Scones from Scratch
I’ll be the first to admit it: I’ve baked a lot of hockey puck scones in my time. I developed this recipe after testing over a dozen methods because I wanted to move past those dry, crumbly versions we’ve all suffered through. What I discovered is that a great American scone is all about the balance of fat and flour. Unlike British scones, which are a bit leaner and meant for topping with jam, these are richer, buttery, and have that perfect tender crumb that’s delicious all on its own.
Whether you’re in the mood for zesty raspberry lemon or a savory sharp cheddar, my master scone recipe takes away all the stress. It’s become a total staple in my kitchen because it’s so flexible! Once you get this one dough down, you can make basically any flavor your heart (or your pantry) desires!

Email this Recipe
Enter your email and we’ll send the recipe directly to you!
By submitting this form, you consent to receive emails from Easy Dessert Recipes.
3 Keys for Soft and Fluffy Scones
To bake classic American scones with a light, tender texture and golden top, I have found it’s important to focus on three key things:
- Cornstarch: Adding a bit of cornstarch to the dough mimics pastry flour by lowering the protein content, creating that melt-in-your-mouth texture.
- Cold Butter: Keeping the butter cold before baking creates steam pockets, giving you that ideal flaky texture.
- Chill Time: Always chill the shaped scones before baking (at least 30 minutes in the freezer). This prevents the butter from melting too early in the oven, which can make scones greasy, dense, or flat.

Master Scone Recipe (American-Style)
Equipment
- Kitchen Scale (optional)
- Food Processor
- Baking Sheet
Ingredients
For the Scone Base:
- 1¾ cups all-purpose flour
- ¼ cup cornstarch
- ⅓ cup granulated sugar *
- 1 tablespoon baking powder
- ½ teaspoon kosher salt
- ½ cup unsalted butter cubed (1 stick)
- ¾ cup heavy cream
- 1 large egg
- 1 teaspoon pure vanilla extract *
For the Egg Wash:
- 1 large egg lightly beaten
- 1 teaspoon water
Optional Mix-Ins:
- 1 cup raspberries fresh or frozen
- 1 cup blueberries fresh or frozen
- 1 teaspoon fresh lemon zest
- 1 cup chocolate chips
- 1 cup shredded cheddar cheese
Instructions
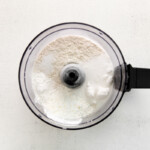
- Place the flour, cornstarch, sugar, baking powder, and salt in the bowl of a food processor. Pulse 5-10 times, or until well combined.1¾ cups all-purpose flour, ¼ cup cornstarch, ⅓ cup granulated sugar, 1 tablespoon baking powder, ½ teaspoon kosher salt

- Add the cubed butter and pulse until the butter is the size of peas, about 10 pulses.½ cup unsalted butter
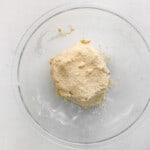
- In a large bowl, whisk together the heavy cream, egg, and vanilla. Add the butter-flour mixture to the wet ingredients and mix until the dough begins to come together into large clumps. If using any add-ins, add them to the dough now.¾ cup heavy cream, 1 large egg, 1 teaspoon pure vanilla extract, 1 cup raspberries, 1 cup blueberries, 1 cup chocolate chips, 1 cup shredded cheddar cheese
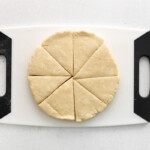
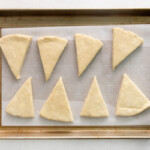
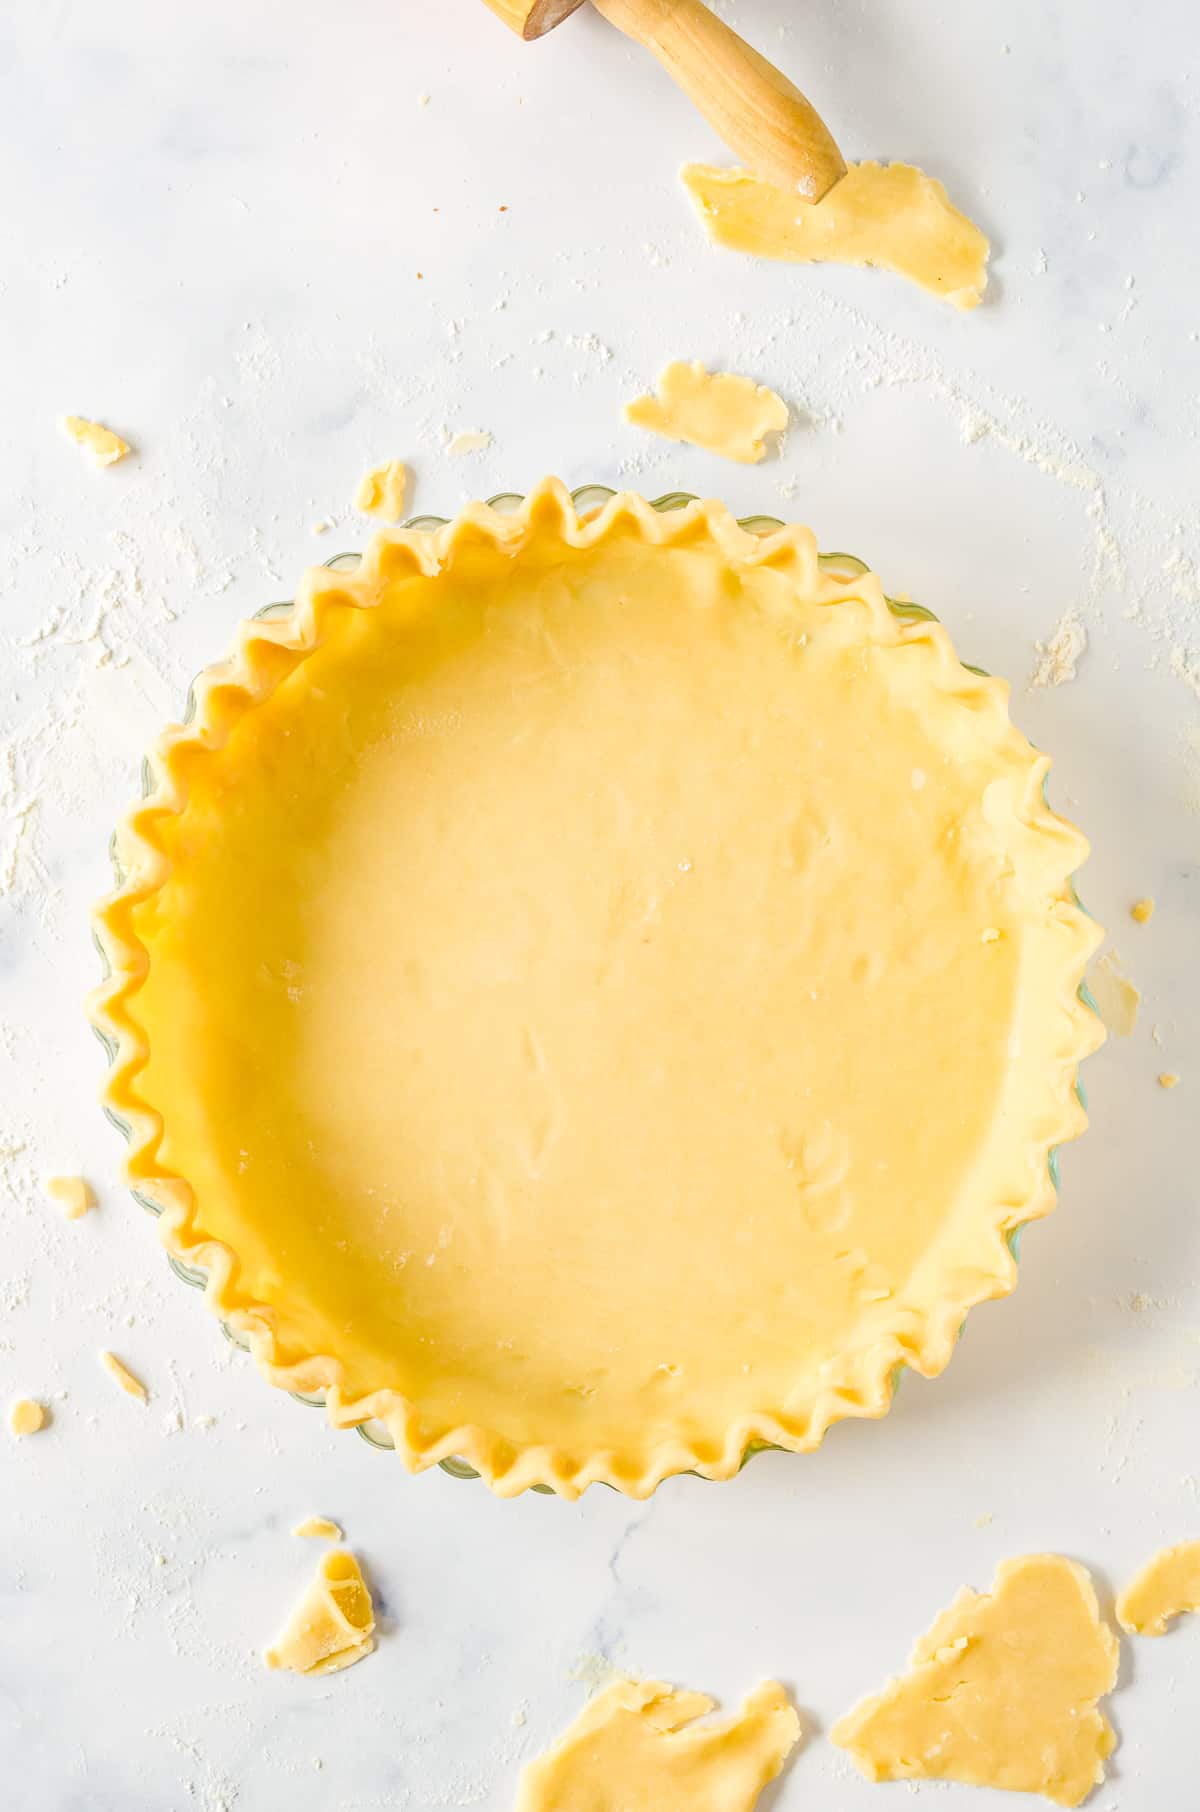
- Turn the dough out onto a lightly floured surface and gently shape it into an 8-inch round circle. Cut into 8 equal-sized triangles.
- Place the scones on a parchment-lined baking sheet at least 2 inches apart. They will spread a little while baking.
- Place the scones in the freezer to chill for 30 minutes. While the scones chill, preheat your oven to 350°F.
- When the oven is fully preheated, brush the scones with egg wash and sprinkle them with coarse sugar, if using. Bake for 22-25 minutes, or until the scones are puffed and golden brown around the edges.1 large egg, 1 teaspoon water
- Allow the scones to cool completely before enjoying.


Notes
- Measure the flour using the spoon-and-level method to avoid dense, dry scones.
- Cold butter is very important! I like to leave it in the fridge until the minute I’m ready to use it.
- Make sure your baking powder is in-date! It’s key to fluffy scones.
- When cutting the dough into triangles, press straight down. Don’t use a sawing motion, or you’ll compress the layers.
- Let the dough chill in the freezer while the oven preheats. This works better (and faster) than chilling in the fridge.
- Perfectly baked scones will be ready to take out of the oven when they look puffy and golden brown around the edges. The center should not look doughy! They will harden as they cool.
- I recommend letting the scones cool after baking. But you can quickly heat them up if you prefer them warm.
- Blueberry Scones: Add 1 cup blueberries + 1 tsp lemon zest
- Chocolate Chip Scones: Add 1 cup chocolate chips
- Raspberry Scones: Add 1 cup raspberries (fresh or frozen)
- Cheddar Scones: Add 1 cup shredded cheddar (omit sugar + vanilla)
- Whisk together 1 cup of powdered sugar, 2 tablespoons of milk, and 1 teaspoon of vanilla extract. Drizzle over the baked scones and allow the glaze to set completely before storing.
- Stir together 3 tablespoons of melted butter with ½ teaspoon garlic powder and 1 tablespoon thinly sliced chives. Brush over the scones when they come out of the oven and sprinkle with flaky sea salt.
What About Buttermilk?
Some scone recipes call for buttermilk, and while it can work, I found that heavy cream produces the most tender, rich texture during testing. Buttermilk has a tangier flavor, which I found didn’t pair well with sweeter mix-ins like chocolate chips or berries. That said, it’s actually great in savory scones, especially those made with cheese, herbs, or bacon. If you prefer a more pronounced tang or are making cheese scones, feel free to swap in buttermilk 1:1 for the cream.
How to Make Flaky Scones Step-by-Step
Mix the Dry Ingredients: Add 1¾ cups of all-purpose flour (spooned and leveled), ¼ cup of cornstarch, ⅓ cup of granulated sugar, 1 tablespoon of baking powder, and ½ teaspoon of kosher salt to the bowl of a food processor. Omit the granulated sugar if making savory scones. Pulse 5-10 times, or until well combined. Alternatively, you can simply stir these ingredients together in a large metal bowl (I recommend chilling the bowl before beginning to help keep the butter cold in the next step).

Cut in the Butter: Add ½ cup of cold cubed unsalted butter and pulse until the butter is the size of peas, about 10 pulses. Alternatively, cut in the butter with a pastry cutter, fork, or your fingers. It’s essential to use cold butter here to help get that beautiful flaky texture. If using your fingers, place the bowl back into the fridge for a few minutes if the butter gets too soft.

Add the Wet Ingredients: In a large bowl, whisk together ¾ cup of heavy cream, 1 large egg, and 1 teaspoon pure vanilla extract (omit the vanilla if making savory scones). Again, use cold ingredients so as not to heat up the butter. Add the butter-flour mixture to the wet ingredients and mix until the dough begins to come together into large clumps. If using any add-ins, fold them gently into the dough now.

Shape and Cut the Scones: Turn the dough out onto a lightly floured surface and gently shape it into an 8-inch round circle. The dough should look shaggy and slightly dry–don’t panic! If it looks like a smooth cookie dough, you’ve overmixed it. Cut the dough into 8 equal-sized triangles. I like to use a bench scraper to get even slices, but a regular kitchen knife also works well.

Chill the Scones: Place the scones on a parchment-lined baking sheet, making sure to place them at least 2 inches apart. They will spread a little while baking. Place the scones in the freezer to chill for 30 minutes. Do NOT skip this step! If your scones are too warm, the butter will melt out, and they will turn out greasy and hard. While the scones chill, preheat your oven to 350°F.

Bake the Scones: Once your oven is fully preheated, beat 1 large egg and 1 teaspoon of water together to make an egg wash. Brush the scones with the egg wash and sprinkle them with coarse sugar for sweet scones or flaky salt for savory scones. Bake for 22-25 minutes, or until the scones are puffed and golden brown around the edges. Allow the scones to cool completely before enjoying.

How to Store, Freeze, and Reheat
After baking these homemade scones, let them cool completely before eating or storing them. They’ll keep well in an airtight container at room temperature for up to 3 days, in the refrigerator for up to 5 days, or in the freezer for up to 3 months. To reheat, place them in a 300°F oven for 5-7 minutes to refresh the texture without drying them out. Avoid microwaving, as this can make them rubbery or soggy.
This recipe is optimized for all-urpose flour. If you use bread flour, your scones will be too chewy and tough. If you want a more delicate, cake-like scone, you can use pastry flour, but you should omit the cornstarch in that case since pastry flour already has a lower protein content.
Not at all! I love the food processor for speed and keeping the butter cold, but you can use a pastry cutter or two forks to cut the butter into the flour. If using your hands, work quickly so the heat from your palms doesn’t melt the butter.
If your scones flattened out like cookies, it usually means the butter was too warm before hitting the oven. Even if you start with cold butter, the heat from your hands or the room can soften it while you’re shaping the dough. This is why the 30-minute freezer chill is the most important step! Also, ensure your oven is fully preheated to 350°F before baking.
American scones should be slightly crumbly, but they shouldn’t be dry like sawdust. This usually happens if there is too much flour. Ensure you are using the spoon-and-level method or a kitchen scale (your flour should weigh about 210 grams for this recipe). Additionally, avoid over-mixing; once you add the wet ingredients, stir just until the flour streaks disappear.
Aside from checking your baking powder’s expiration date, the culprit is often using a sawing motion when cutting the dough. If you slide the knife back and forth, you smear the buttery layers together, effectively sealing the edges shut. Pressing straight down with a sharp knife or bench scraper leaves the edges open, allowing the steam to push the layers upward for a tall, flaky rise.


Leave a Reply