


These pink macarons are one of my favorite Valentine’s Day treats because they look fancy but are totally doable at home. The shells bake crisp outside and chewy inside, while the cream cheese filling adds a tangy sweetness that balances everything perfectly. If macarons have ever intimidated you, don’t worry; they’re not as mysterious as they seem. My recipe keeps things simple with a classic meringue base and an easy filling, so you can get bakery-worthy results without the fuss.

Pink Macarons Filled with Cream Cheese
Macarons can be tricky, but after baking dozens of batches, I’ve figured out what works. The two biggest keys are the right batter consistency and letting the shells rest long enough to form a dry skin. Once you nail those steps, the rest is straightforward, and the results are absolutely worth it.
I designed this Valentine’s Day macaron recipe to be approachable, even if you’ve never made macarons before. You don’t need fancy tools or complicated techniques–just a clean mixing bowl, patience, and the confidence to stop folding at the right moment. Follow the instructions, use the tips, and you’ll get smooth tops, even feet, and a chewy center every time.


Email this Recipe
Enter your email and we’ll send the recipe directly to you!
By submitting this form, you consent to receive emails from Easy Dessert Recipes.
Why Macarons Are So Sensitive
Macarons rely on whipped egg whites for structure and almond flour for texture. The batter needs to be thick enough to hold its shape, but loose enough to spread slightly in the oven. If it’s too thick, the shells won’t spread and can crack; if it’s too thin, they’ll flatten. That’s why the “figure-8” stage matters–it’s the sweet spot where the batter has the right balance of stability and flow.

Valentine’s Day Pink Macarons Recipe
Equipment
- Kitchen Scale (optional, but recommended!)
- Stand Mixer
- Baking Sheet
- Piping Tip Set
- Silpat Mat (optional)
- Oven Thermometer (optional, but recommended!)
Ingredients
For the Shells
- 3 large egg whites room temperature
- ½ cup granulated sugar
- ⅘ cup powdered sugar
- 1 cup almond flour *
- pink gel food coloring optional**
For the Filling
- 3 tablespoons whipped cream cheese
- 6 tablespoons powdered sugar
- ¼ teaspoon pure vanilla extract
- strawberry jam optional
Instructions
Make the Shells
- Line 2 large baking sheets with Silpat mats or parchment paper. Fit a piping bag with a small round tip (like a Wilton #10).
- Create a simple double-boiler by setting a heatproof bowl over a small saucepan of simmering water.
- Add the egg whites and granulated sugar to the bowl. Whisk constantly until the sugar has fully dissolved, about 3-4 minutes.3 large egg whites, ½ cup granulated sugar
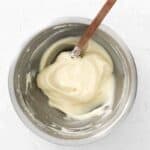
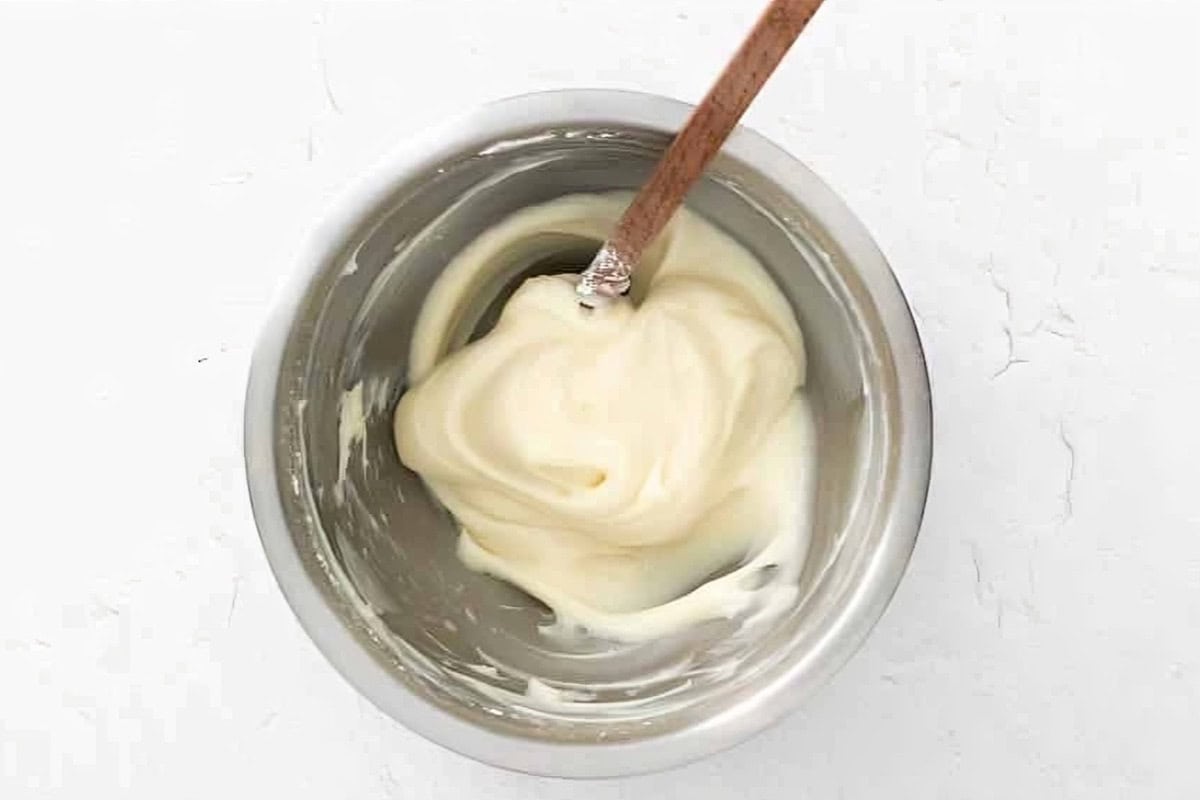
- Transfer the egg white mixture to the bowl of a stand mixer fitted with the whisk attachment. Beat on medium-high speed until they form stiff peaks.
- Sift the powdered sugar and almond flour into the beaten egg whites. Fold the mixture gently to incorporate the dry ingredients into the egg whites.⅘ cup powdered sugar, 1 cup almond flour

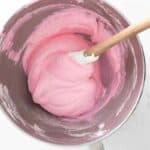
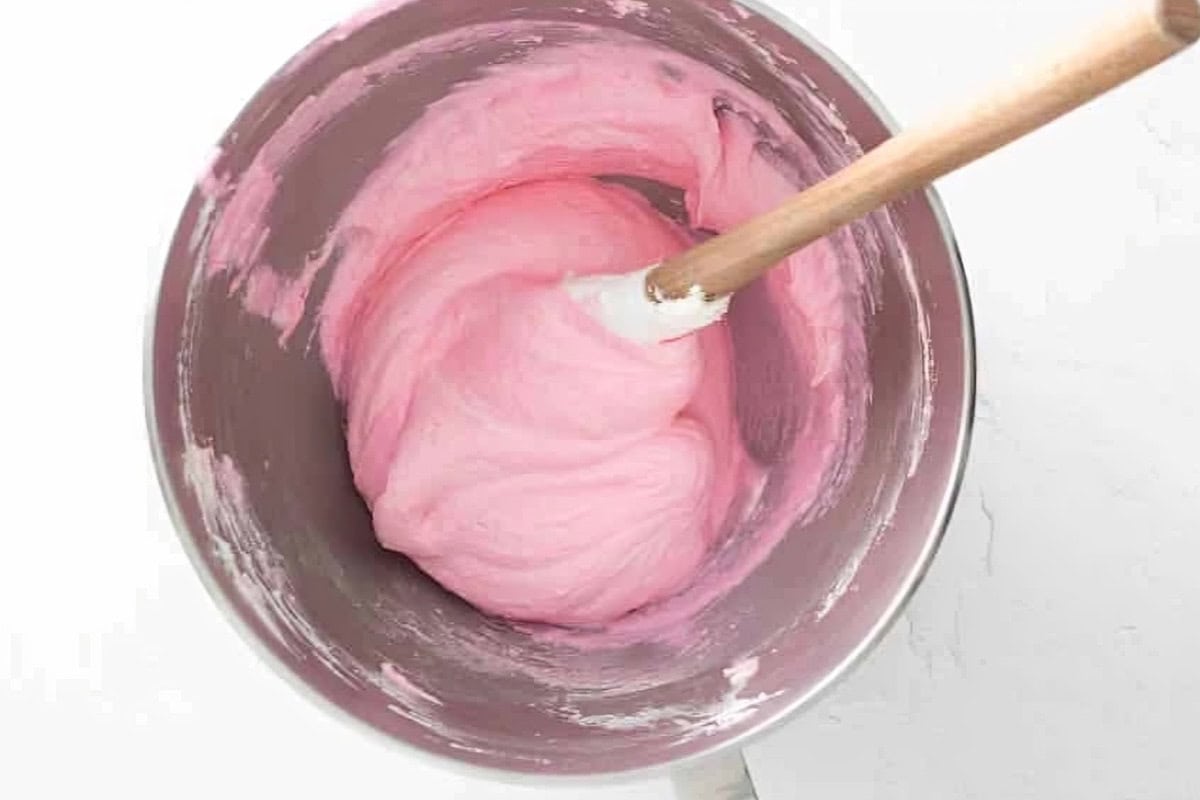
- When about half of the dry ingredients have been incorporated, add pink gel food coloring, if using, and continue folding.pink gel food coloring
- Gently deflate the meringue by smushing it against the sides of the bowl and folding it back together. Repeat the smushing process 3-4 times and then test the meringue to see if it’s at the “figure 8 stage”. If you can draw an 8 with the batter while it flows smoothly, it’s ready. If the meringue falls off in clumps or breaks during the “8”, smush it 1-2 more times and fold it back together. Then repeat the figure 8 test.
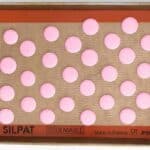
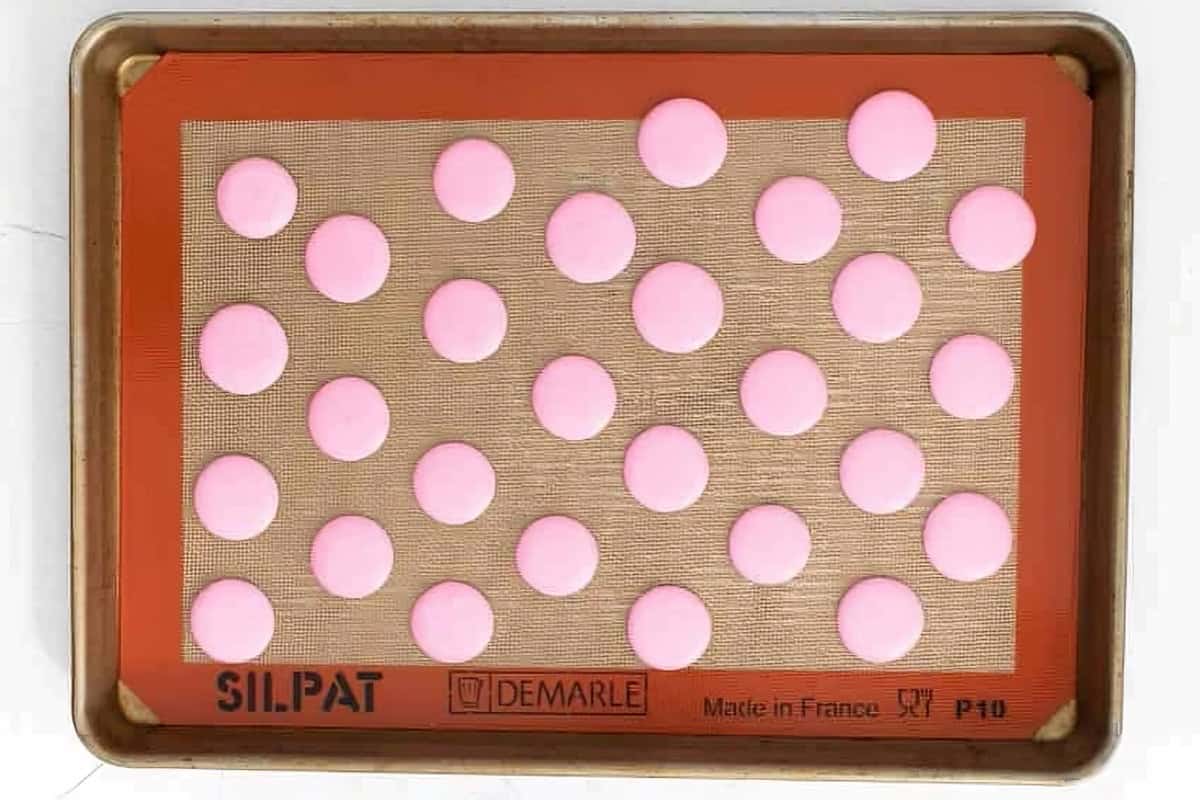
- When the batter flows smoothly, transfer the mixture to the piping bag fitted with a round tip. Pipe 1½-inch circles about 2 inches apart on the prepared baking sheet.
- Immediately after you’ve finished piping the tray, hold it 6 inches off the counter and drop it straight down to release any air bubbles. Repeat the dropping process 5-6 times, or until it looks like any large air bubbles have popped.
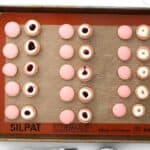
- Set the tray aside to rest for 20-25 minutes, or until the macarons have developed a skin. The macarons are ready to bake when they can be gently touched without sticking to your finger.
- While the macarons rest, preheat your oven to 325°F. Bake the macarons one tray at a time for 14-16 minutes, flipping the tray halfway through baking.
- Allow the macarons to cool on the tray. Once they are fully cooled, they can be filled and aged.
Make the Filling and Age the Macarons
- In a small bowl, combine the whipped cream cheese, powdered sugar, and vanilla extract. Transfer the mixture to a piping bag.3 tablespoons whipped cream cheese, 6 tablespoons powdered sugar, ¼ teaspoon pure vanilla extract
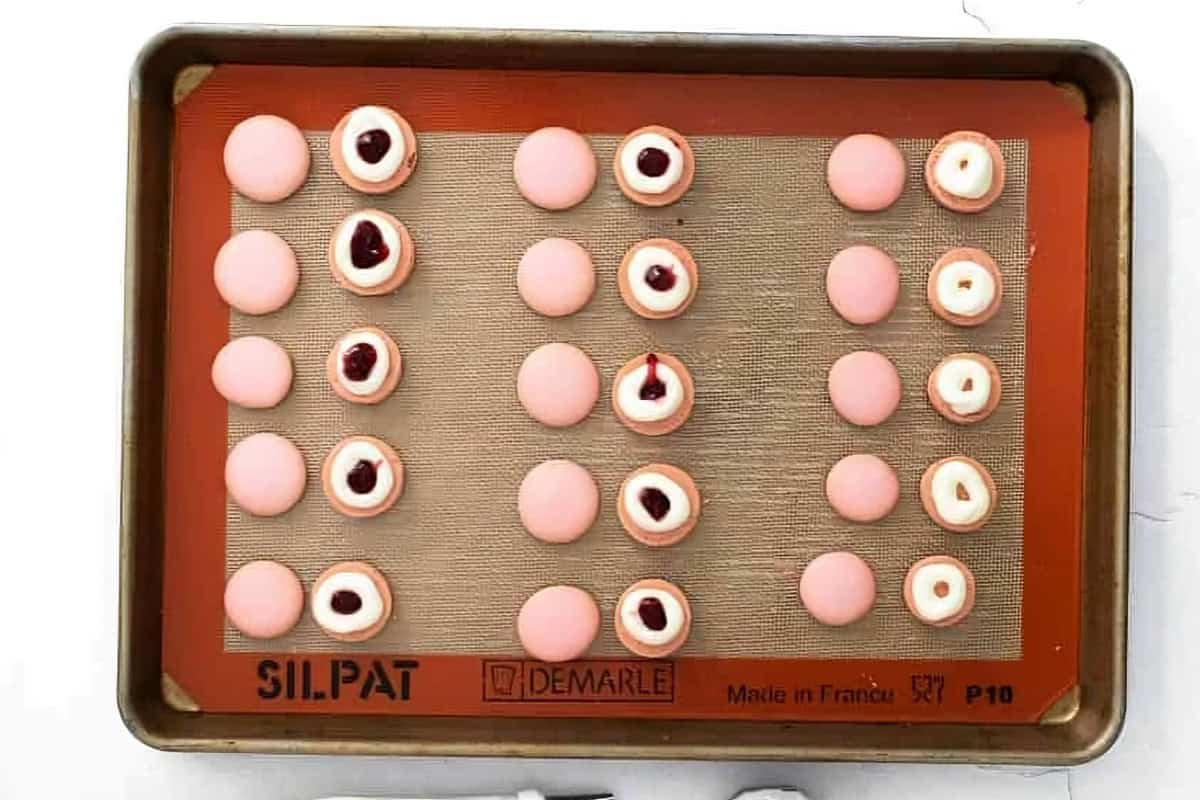
- Place the macarons in similar-sized pairs. Pipe a ring of cream cheese icing around the center of one shell. Fill the inside with ½ teaspoon of strawberry jam, and then place the second shell on top, pressing down lightly until the filling touches the edges. Repeat with the remaining macarons.strawberry jam
- Place the macarons in an airtight container in the fridge to rest overnight. Bring the macarons to room temperature before serving.
Notes
- For best results, use a kitchen scale and gram measurements. Macarons are precise –click the “Metric” button below the ingredients to convert.
- Avoid humid or rainy days. If the shells don’t form a skin after 30-40 minutes, humidity is likely the issue.
- Sift the almond flour and powdered sugar at least once (twice if coarse). Discard large almond pieces instead of forcing them through the sieve.
- Your oven must be 325°F. An oven thermometer is strongly recommended.
- Make macarons at least 12 hours in advance and refrigerate to allow time for proper aging.
- Folding the dry ingredients into the meringue is one of the most important steps. The batter should flow smoothly and pass the figure-8 test without breaking.
- Hold the piping bag straight up and down when piping; don’t try to draw circles.
- Resting allows the shells to form a skin, helping them bake evenly without spreading.
- To avoid hollow shells, don’t over-mix, and make sure to bake fully.
- Tops should not wiggle when gently nudged
- Feet should be set and dry, not sticky
- Shells should lift cleanly from the mat without leaving centers behind
How to Make Valentine’s Day Macarons Step-by-Step
Mix the Batter: Start by lining 2 large baking sheets with Silpat mats or parchment paper. Fit a piping bag with a small round tip–a Wilton #10 works great for evenly sized shells. Set a heatproof bowl over a small saucepan of gently simmering water, making sure the bowl isn’t touching the water. Add 90 grams of room-temperature egg whites (about 3 large) and 90 grams of granulated sugar (about ½ cup) to the bowl. Whisk constantly for 3–4 minutes, just until the sugar fully dissolves–this helps set you up for a smoother, more stable meringue. Transfer the mixture to the bowl of a stand mixer fitted with the whisk attachment. Beat on medium-high speed until stiff, glossy peaks form. The meringue should hold its shape without drooping. Next, sift 95 grams of powdered sugar (about ⅘ cup) and 95 grams of almond flour (about 1 cup) together, discarding any large almond pieces instead of forcing them through. Add the dry ingredients to the meringue and begin folding gently with a spatula.
Color and Fold the Batter (Macaronage): When about half of the dry ingredients are incorporated, add a small amount of pink gel food coloring (gel or powder only, never liquid!). This is the best time to add color, so you don’t have to over-mix later. Continue folding, then begin gently pressing the batter against the sides of the bowl and folding it back over itself. Repeat this “smush and fold” motion 3-4 times, then test the batter. You’re looking for the figure-8 stage: the batter should flow smoothly off the spatula and allow you to draw an “8” without breaking. If it falls in clumps or snaps, give it one or two more folds and test again. It’s better to go slowly here–over-mixing can lead to flat or hollow shells.
Pipe and Bake the Macarons: Transfer the batter to your prepared piping bag. Pipe 1½-inch circles, spacing them about 2 inches apart. Hold the piping bag straight up and down–don’t try to draw circles–and let the batter spread naturally. Once the tray is piped, lift it about 6 inches off the counter and drop it straight down 5–6 times to release air bubbles. You should see any large bubbles rise and pop. Let the shells rest at room temperature for 20-25 minutes, or until a dry skin forms. When gently touched, the tops should feel dry and not stick to your finger. If they’re still tacky after 30-40 minutes, humidity is usually the culprit. While the shells rest, preheat your oven to 325°F (an oven thermometer is strongly recommended for accuracy). Bake one tray at a time for 14–16 minutes, rotating the tray halfway through. The macarons are done when the tops no longer wiggle, the feet are set and dry, and the shells lift cleanly from the mat without leaving centers behind. Allow the shells to cool completely on the tray before filling.
Fill and Age the Macarons: In a small bowl, mix 40 grams of whipped cream cheese (3 tablespoons), 40 grams of powdered sugar (6 tablespoons), and 1 gram of vanilla extract (¼ teaspoon) until smooth. Transfer the filling to a piping bag. Pair the shells by size. Pipe a ring of cream cheese filling around the edge of one shell, then add about ½ teaspoon of strawberry jam in the center, if using. Top with the matching shell and gently press until the filling reaches the edges. Place the filled macarons in an airtight container and refrigerate overnight. This resting time allows the filling to soften the shells just enough for that classic chewy texture. Bring them to room temperature before serving.
Cracked tops usually happen when the shells don’t develop a dry skin before baking, or your oven is too hot. Make sure you let them rest for 20-25 minutes, and use an oven thermometer to confirm the temperature. If the tops are still sticky after 30-40 minutes, humidity is likely the culprit.
Hollow shells are usually caused by over-mixing or under-baking. If the batter looks too runny, stop folding sooner. Also, make sure you bake them until the feet are set and the tops don’t wiggle.
No feet typically means the batter is too thin or the shells didn’t rest long enough. Fold less during macaronage, and let the piped shells sit until they form a dry skin before baking.
If your shells are too chewy, they may not have baked long enough, or they weren’t rested long enough before baking. Let the shells form a skin and bake until the feet are dry and the tops no longer wiggle.
They’re finished when 1) The tops no longer wiggle when nudged. 2) The feet are set and dry. 3) The shells lift cleanly from the mat without leaving centers behind
How to Store and Freeze
For the best texture, store finished Valentine’s Day macarons in an airtight container in the refrigerator for up to 3 days or in the freezer for up to 3 months. Before serving, let them come to room temperature for about 30 minutes so the shells soften slightly and the filling becomes creamy again.
If you’re making these for a special occasion, I recommend filling and refrigerating them at least 12 hours in advance. That resting time lets the filling soften the shells just enough for the classic chewy macaron texture.


Leave a Reply