Turn your waffle game up a notch with these delicious sour cream waffles! This sour cream waffle recipe makes perfect, fluffy waffles every time. Top with some melted butter and fresh berries for a vibrant and sweet treat!

Waffles from Scratch
Why use sour cream to make waffles? The answer is simple! Sour cream activates the leavening properties of the baking powder and eggs, giving you the lightest and fluffiest waffles you could ever dream of.
Not only that, it adds a hint of sour flavor that contrasts so well with pure maple syrup. Delish!
Why You’ll Love this Waffles Recipe:
- Makes The Best Waffles: Adding sour cream to your waffle batter is a game changer! Delivering good results, every time.
- Customizeable: Waffles are a wonderful canvas for various kinds of toppings and mix-ins. Get creative with it!


Email This Recipe
Enter your email and we’ll send the recipe directly to you!
How to Make Sour Cream Waffles
Be sure to see the recipe card below for full ingredients & instructions!
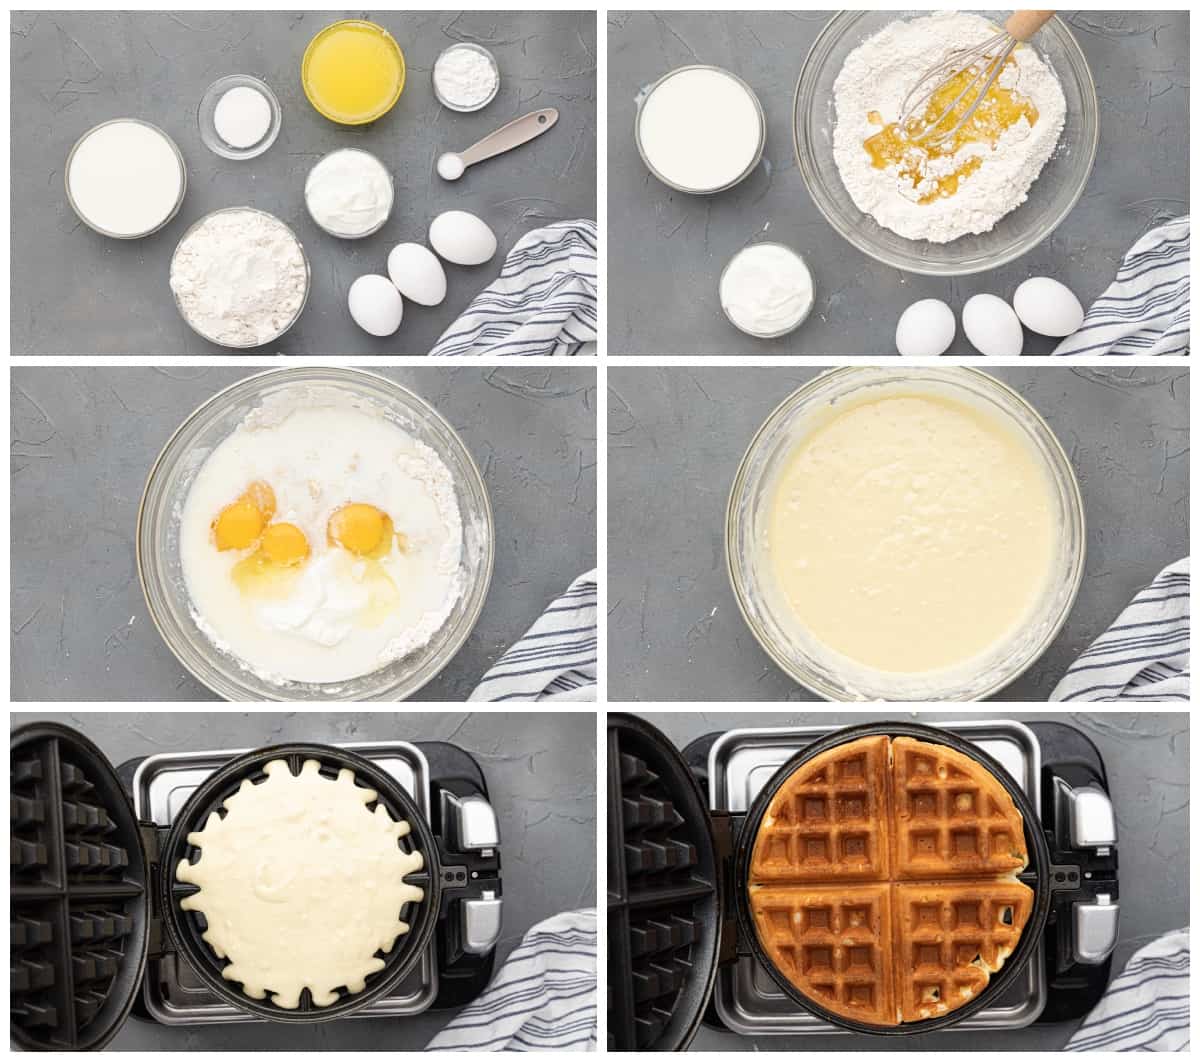
- Heat and prep your waffle iron according to your brand of iron.
- In a large mixing bowl, whisk together the dry ingredients. Then add the wet ingredients and whisk until combined.
- Pour the batter into the waffle maker mold and cook.
- Serve immediately with syrup or fruit. Enjoy!
Sour cream adds moisture and a bit of a sour flavor to waffles, giving them a unique and elevated flavor!
You sure can! You may end up with fewer waffles, though!
To make these waffles gluten-free, use a gluten-free 1:1 baking flour, such as Cup4Cup.
Yes, but they may come out a bit crisper and less fluffy. I really recommend using a pancake recipe to make pancakes for the best results.

Recipe Tips and Tricks
Be sure to transfer your batter to the waffle maker right away. Otherwise, the little air bubbles will collapse and make for chewier waffles.
However, if you prefer chewier waffles, let the batter rest for 30 minutes. If you want crispy waffles, add a little cornstarch to your batter.
Make Ahead Instructions
While these waffles are best enjoyed on the day they are made, they can be made up to 1 day in advance and stored in an airtight container in the refrigerator until ready to reheat.
Storage Instructions
Store leftover sour cream waffles in an airtight container in the refrigerator for up to 2 days. Reheat in a 250°F oven for 10 minutes.
Freezing Instructions
Freeze sour cream waffles in a single layer on a parchment-lined baking sheet until solid, about 1-2 hours. Transfer to an airtight container or Ziplock bag to store for up to 3 months. Reheat directly from frozen, adding an additional 2-3 minutes to the bake time.
Substitutions
- For gluten-free waffles, swap the all-purpose flour for gluten-free 1:1 baking flour.
- For lighter waffles, swap the all-purpose flour for an equal amount of cake flour.
- Feel free to use whatever milk you have on hand, including dairy-free milk.
- In place of the sour cream, you could also use plain or Greek yogurt.
Topping Suggestions
- Maple Syrup
- Whipped Cream
- Chocolate Chips
- Bananas
- Hot Fudge Sauce
- Nutella
- Cream Cheese Spread
- Berries
- Lemon Curd
- Sprinkles
- Peanut Butter
- Caramel Sauce
- Fruit Jam
- Ice Cream
Tips for the Best Sour Cream Waffles
- Use room temperature ingredients for the best results.
- Do not overmix the batter. This can lead to tough, chewy waffles.
- Avoid opening the waffle iron before the waffles are done; they may split if they’re not finished cooking.
- Serve the waffles hot as they come off the iron. Leaving them out will lead to soggy waffles.
- Keep the waffles warm and crisp by placing them on a lined baking sheet in a 200°F oven until ready to serve.

It’s amazing how a little bit of sour cream can turn simple waffles into a pillowy, fluffy masterpiece.
We hope you enjoy this delicious waffle recipe for your next breakfast! (Or late-night sweet craving… we don’t judge.)
If you make this recipe be sure to leave us a comment or rating. Enjoy!

Sour Cream Waffles Recipe
Ingredients
- 1¾ cups all-purpose flour 210 grams
- 1 tablespoon granulated sugar 13 grams
- 1 tablespoon baking powder 12 grams
- ½ teaspoon kosher salt
- ½ cup unsalted butter 113 grams, melted (1 stick)
- 1 cup milk 227 grams, room temperature
- ½ cup sour cream 114 grams, room temperature
- 3 large eggs 150 grams, room temperature
Equipment
- Kitchen Scale (optional)
- Waffle Iron
Instructions
- Heat and prepare your waffle iron according to your brand of iron.
- In a large bowl, combine the dry ingredients, and whisk them together.1¾ cups all-purpose flour, 1 tablespoon granulated sugar, 1 tablespoon baking powder, ½ teaspoon kosher salt
- Add in the butter, milk, sour cream, and eggs, whisking until the batter is combined and without clumps.½ cup unsalted butter, 1 cup milk, ½ cup sour cream, 3 large eggs
- Use a scoop or ladle to scoop the batter and cover the waffle maker mold. Spread the batter evenly, with a rubber spatula if necessary. Close the cover of the waffle maker and allow the waffle to cook.
- Repeat with the remaining batter.
- Serve immediately with syrup or fruit.
Notes
- For gluten-free waffles, swap the all-purpose flour for gluten-free 1:1 baking flour.
- For lighter waffles, swap the all-purpose flour for an equal amount of cake flour.
- Feel free to use whatever milk you have on hand, including dairy-free milk.
- In place of the sour cream, you could also use plain or Greek yogurt.
- Use room temperature ingredients for the best results.
- Do not overmix the batter. This can lead to tough, chewy waffles.
- Avoid opening the waffle iron before the waffles are done; they may split if they’re not finished cooking.
- Serve the waffles hot as they come off the iron. Leaving them out will lead to soggy waffles.
- Keep the waffles warm and crisp by placing them on a lined baking sheet in a 200°F oven until ready to serve.





















Leave a Review