Have a little fun in your kitchen by making these delicious, rainbow-colored homemade Funfetti Cookies! They’re perfect for any type of celebration, and don’t worry – they’re not just vibrant and pretty, but they’re tasty, too!

What’s in this Funfetti Cookie Recipe?
For my birthday this year, I might just skip the cake and make a batch of these easy funfetti cookies instead! They’re delicious and impossible to just eat one of. Made with ingredients like sprinkles and white chocolate chips, each bite of these cookies is fun and scrumptious!
- All-Purpose Flour: Gives these cookies structure.
- Baking Powder: Helps the cookies rise in the oven.
- Cornstarch: Thickens these cookies and makes them soft and tender.
- Salted Butter: Adds richness, moisture, and the perfect amount of salt.
- Granulated Sugar: Sweetens the cookies.
- Egg: Adds richness and gives the cookies structure.
- Vanilla Extract: Adds that classic funfetti cake flavor.
- White Chocolate Chips: Add buttery sweetness.
- Rainbow Sprinkles: The key ingredient that takes these cookies from good to great!
Pro Tip: Measure your flour using the spoon-and-level method to prevent dense, dry cookies.
Variations on Confetti Cookies
The best part of funfetti cookies is that “fun” is literally in the name! You can get creative with these cookies in so many ways. While white chocolate chips are my favorite, stores lately have tons of different options. Just the other day, I saw unicorn chocolate chips at the grocery store. Those would be too cute baked into these cookies!
Different colored sprinkles for different holidays would also be so fun! Red and green for Christmas; orange, purple, and black for Halloween; or red and pink for Valentine’s Day would make these so festive!

Email This Recipe
Enter your email and we’ll send the recipe directly to you!
Funfetti is the trademarked name for confetti cake coined by Pillsbury in 1989. Confetti cake is a vanilla cake with rainbow sprinkles. Now, funfetti has expanded to include any vanilla-flavored dessert with sprinkles.
These cookies taste just like funfetti cake– warm, vanilla-y, and sweet from the white chocolate. The crunchy sprinkles make them so fun to eat!
Yes! You can roll the dough into balls and store it in the refrigerator for up to 2 days before baking them.
I recommend using long, skinny jimmies rather than nonpareils, as they are less likely to bleed color into the dough.
In this recipe, we add sprinkles to the dough, and you can also roll the dough balls in more sprinkles before baking. This helps them to adhere to the dough!
Cornstarch helps to make the cookies soft and tender. It also helps the cookies to spread less by thickening up the dough!
If your cookies turned out flat, you may have added too much butter to the dough. Try adding a bit more flour to firm them back up. You can also chill them in the refrigerator for 15-30 minutes to keep them from spreading too much.

How to Store
In an airtight container at room temperature, these funfetti cookies will stay fresh and delicious for up to 3 days. To make them last a bit longer, you can place them in an airtight container in the refrigerator, where they’ll stay fresh for up to 5 days.
How to Freeze
These cookies are freezer friendly. They’ll stay fresh in the freezer for up to 1 month. When storing them, I recommend placing them in a durable Ziplock bag that’s insulated with paper towels. When you’re ready to enjoy them, let the cookies thaw at room temperature for a few hours, and they should be good as new!
Serving Suggestions
Enjoy these funfetti cookies with a glass of milk or a strawberry hot cocoa bomb.
One of my favorite things to do is to pipe vanilla frosting, stabilized whipped cream, or a heaping scoop of vanilla ice cream in the middle of 2 cookies and make a funfetti cookie sandwich!


Funfetti Cookies Recipe
Ingredients
- 1½ cups all-purpose flour 180 grams
- 2 teaspoons baking powder 8 grams
- 2 teaspoons cornstarch 15 grams
- ½ cup salted butter 113 grams, room temperature (1 stick)
- 1 cup granulated sugar 200 grams
- 1 large egg 50 grams, room temperature
- 1 teaspoon pure vanilla extract 4 grams
- ¾ cup white chocolate chips 128 grams
- ¾ cup rainbow sprinkles 144 grams, divided
Equipment
- Kitchen Scale (optional)
- Baking Sheet
- Hand Mixer
Instructions
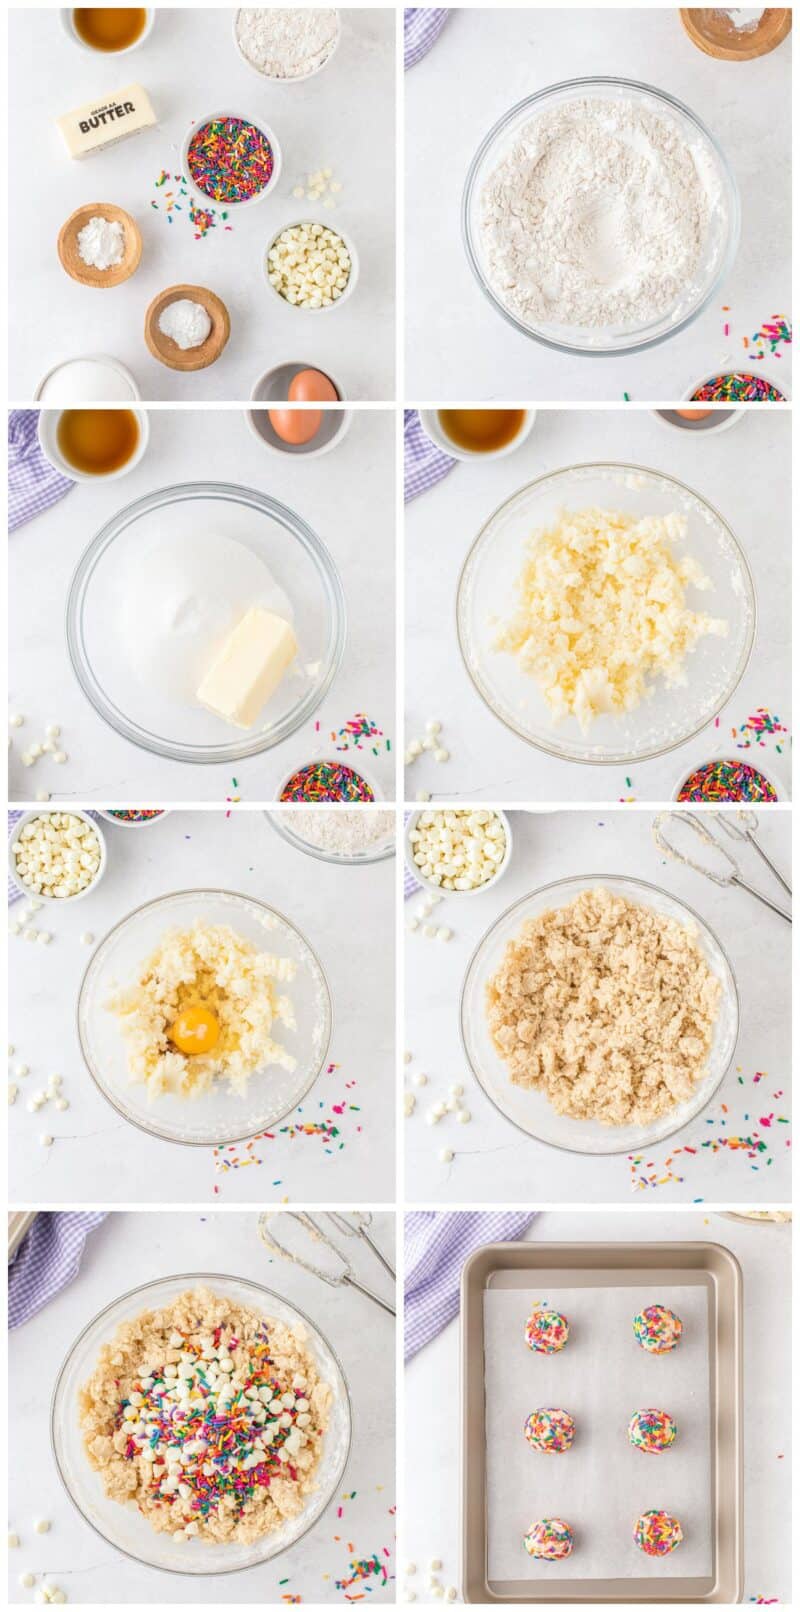
- Preheat the oven to 350°F. Line a baking sheet with parchment paper. Set aside.
- In a medium bowl, stir the all-purpose flour, baking powder, and cornstarch together. Set aside.1½ cups all-purpose flour, 2 teaspoons baking powder, 2 teaspoons cornstarch
- In a large bowl, with a hand mixer, beat the butter and sugar together on medium-high speed until smooth and fluffy. Make sure it is very light and creamed before moving on.½ cup salted butter, 1 cup granulated sugar
- Once the mixture is creamed and fluffy, add in the egg and vanilla extract. Mix together until completely combined.1 large egg, 1 teaspoon pure vanilla extract
- On low speed, add in the flour, baking powder, and cornstarch mixture. Make sure it is all mixed together by scraping down the sides of the mixer bowl.
- Fold in the chocolate chips and ½ cup of the sprinkles.¾ cup white chocolate chips, ¾ cup rainbow sprinkles
- Scoop 1-inch balls of dough onto the prepared baking sheet.
- Take the remaining ¼ cup of the divided sprinkles and roll each cookie in the mix, gently pressing into the sides.
- Bake for 8-10 minutes. Do not let the cookies brown.
- Let the cookies rest for 1-2 minutes before taking them off the sheet pan and placing on a wire rack to cool completely.
Notes
- Rolling the cookie dough into sprinkles is completely optional. It adds more color and sweetness, but the cookies will taste just as good without the additional step.
- Making these cookies around Christmas? Swap the rainbow sprinkles for red and green sprinkles for a fun, festive twist!
- Do NOT allow these cookies to brown! Usually, you can tell when cookies are done baking when they begin to brown around the edges. If these cookies brown, however, that means they’re over-cooked.
- Let the cookies cool for a couple of minutes on the baking sheet before transferring them to a wire rack. That way, they won’t crumble and fall apart.





















Leave a Review